A yellowish ceiling stain appears in a Concord home the morning after an atmospheric river moves through the Bay Area in February. The homeowner reaches for a bucket, checks the attic, and wonders whether a small patch will solve the problem or whether the entire roof has reached the end of its useful life.
That visible stain is usually a late signal. Water may have already traveled through the decking, underlayment, insulation, rafters, or flashing before it reached the Sheetrock. The right residential roof repair decision starts with finding the entry path, documenting the damage, and separating a localized failure from a roof system that's deteriorating across multiple areas.
Table of Contents
- When a California Roof Starts Telling You Something
- Common Residential Roof Repairs Homeowners Actually Face
- How Professionals Diagnose a Roof Leak Step by Step
- What Residential Roof Repair Really Costs in 2026
- When to DIY and When to Call a Licensed Roofer
- Permits, Warranties, and Insurance in California
- Your Next Steps After Reading This Guide
When a California Roof Starts Telling You Something
A Concord homeowner might first notice a faint brown ring near a ceiling light after a winter storm. The mark may look small, but the water didn't necessarily enter directly above it. Roof leaks commonly move along framing and sheathing before gravity pulls them into the room, which is why the visible stain can sit well away from the actual failure point. A sound inspection starts in the attic and traces water uphill toward the roof surface, as described in this technical roof-leak diagnosis guide.
The roof usually provides earlier warnings if someone knows where to look:
- After a heat wave: Asphalt shingles may curl, blister, or lose their seal.
- After strong winds: Tile edges may lift or shift, leaving openings beneath the covering.
- At chimney and stucco transitions: Flashing can rust, separate, or lose its seal.
- During the first rain: Loose granules may wash into gutters, signaling surface wear.
Practical rule: A ceiling stain is a symptom, not a diagnosis.
Roof systems fail in layers. The first signal may be a compromised seal or a small flashing gap. The next may be damp underlayment, followed by stained decking, wet insulation, and finally interior damage. The stain on the ceiling is often closer to symptom five than symptom one.
Historic federal housing data shows that reported roof leaks became less common in the United States, declining from 7.6% of households in 1973 to 4.4% in 2023. Yet the issue remains significant because the country has more than 130 million occupied housing units, and outside-water leakage continues to be tracked as a housing defect in federal surveys, according to HUD housing survey coverage.
That combination matters in California. Better materials and installation practices have reduced leak frequency over time, but aging roofs, wind, hail, heat, and deferred maintenance still create serious repair decisions. Catching the first four warning signs is far less disruptive than waiting for wet insulation, damaged framing, or a ceiling replacement.
Common Residential Roof Repairs Homeowners Actually Face
A roofing estimate becomes easier to understand when each line item connects to a visible part of the house. Shingle replacement is like replacing a broken piece on a porch roof. Flashing repair resembles resealing a tub surround, except the roof must direct wind-driven rain away from a vulnerable joint.
Surface and penetration repairs
Shingle and tile replacement removes cracked, missing, curled, or broken pieces and installs compatible material. Wind, heat, impact, and age are common causes. Replacing one or a few pieces may fit a same-day service call, while widespread damage usually requires a larger scope.
Flashing reseal or replacement addresses the thin metal installed around chimneys, vents, walls, and other penetrations. Flashing acts like a waterproof transition between different surfaces. Failed sealant, corrosion, poor installation, and movement can cause leaks. A small reseal may be completed during one visit, but rusted or improperly installed flashing often needs removal and replacement.
Valley retrofit or rebuild repairs the channel where two roof slopes meet. A valley carries concentrated runoff, much like a drainage channel that needs repaving when water begins cutting around its edges. Debris, damaged lining, poor overlaps, and wind-driven rain can create recurring leaks. Valley work is normally part of a broader inspection because surrounding underlayment may also be compromised.
Pipe boot replacement renews the rubber or flexible collar around a plumbing vent. The boot seals the opening where the pipe passes through the roof. Sun exposure and age can crack the collar, making this a common targeted repair.
The California shingle repair guide provides additional context for homeowners comparing a single-shingle repair with broader roof work.
Edge, opening, and airflow repairs
Skylight reseal renews failed seals or addresses damaged flashing around the skylight frame. Condensation can imitate a leak, so the surrounding attic and interior finishes should be checked before applying new sealant.
Gutter apron repair restores the metal transition between the roof edge and gutter. If the apron separates, water can run behind the gutter and wet the fascia.
Fascia board replacement replaces the trim along the roof edge when repeated moisture exposure has caused rot. This is often paired with gutter or apron work rather than treated as an isolated cosmetic repair.
Attic ventilation fixes correct blocked intake vents, inadequate exhaust, or improperly balanced airflow. Poor ventilation can trap heat and moisture, accelerating material deterioration and creating conditions that complicate leak diagnosis. This is usually a larger scope than a same-day patch because the contractor must assess the entire attic airflow path.
How Professionals Diagnose a Roof Leak Step by Step
A ceiling stain appears below a roof penetration, but the visible mark may sit far from the actual entry point. A reliable inspection therefore works from the interior outward. That sequence gives the contractor evidence to separate a localized patch from damage that may justify broader repair or replacement, a distinction that matters when an insurance adjuster reviews the file.
The interior and attic trace
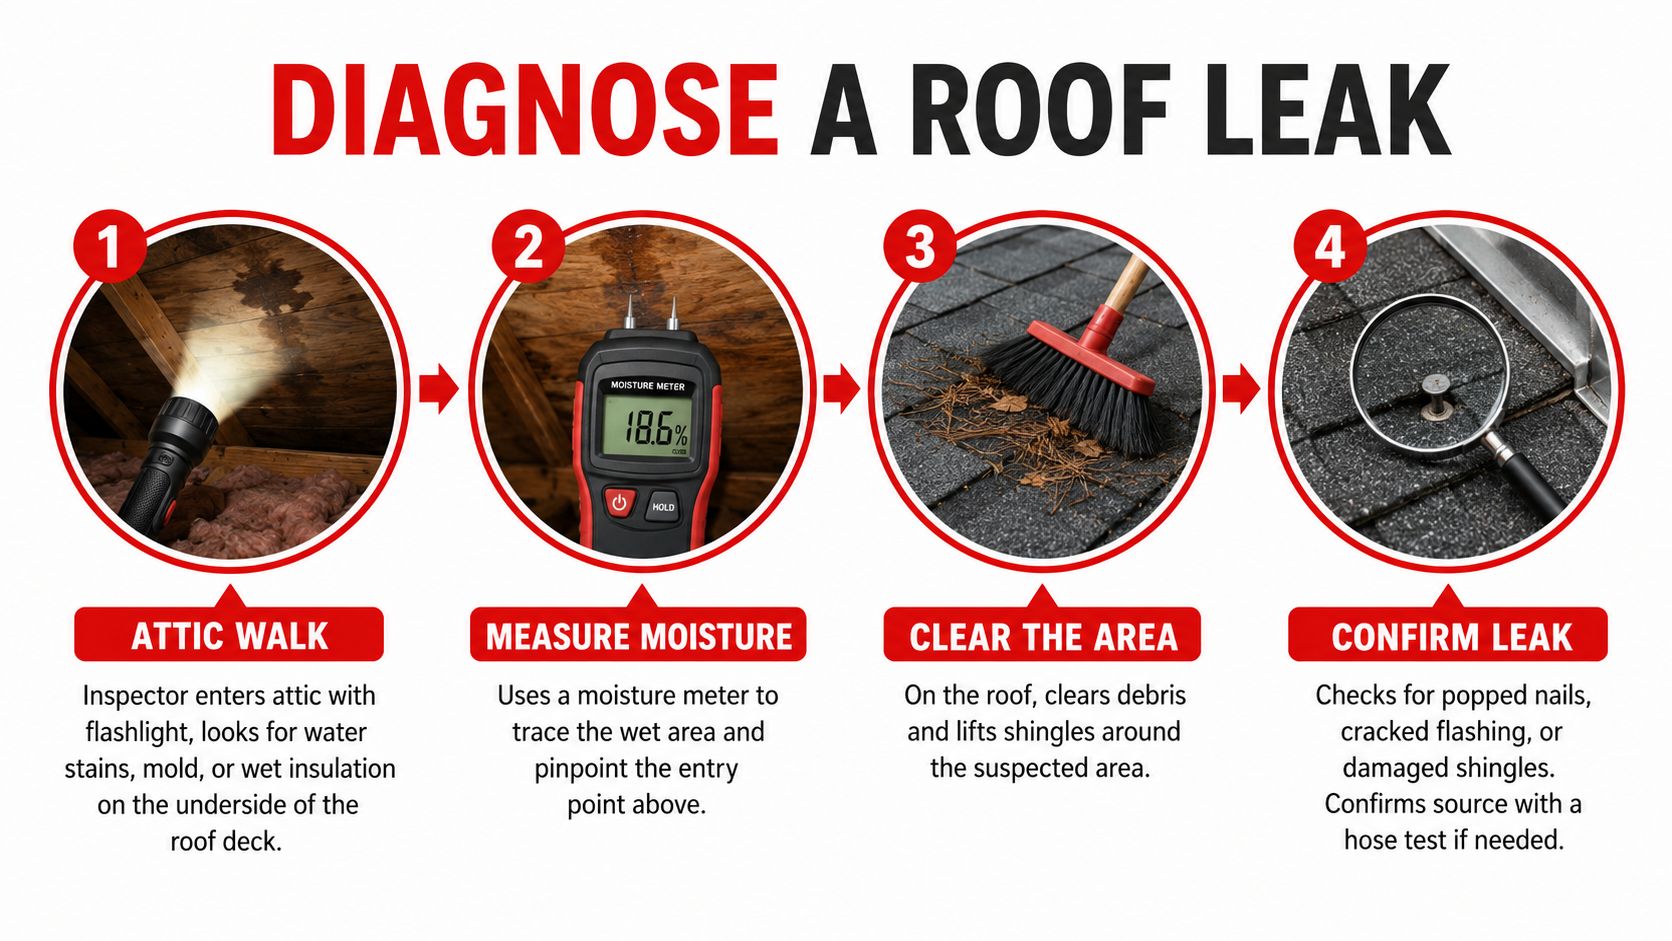
The inspector starts below the roof with a flashlight, checking decking, insulation, nail tips, vents, and surrounding framing. Stained wood, damp insulation, rust, mold-like growth, or daylight can show where water has traveled. A moisture meter helps distinguish an old stain from an active or recent intrusion. Wood sheathing at or above about 18% moisture content is commonly treated as sufficiently wet to indicate intrusion, while sustained moisture above roughly 19% can support wood-decay fungi, according to this moisture and water-intrusion inspection reference.
The ceiling and wall trace comes next. A thermal camera can identify temperature patterns associated with trapped moisture. Infrared inspection has been used since the 1970s to examine flat and low-slope roofs for moisture entrapment, as explained by the Infrared Information Association. Thermal images do not replace moisture readings, but they can show migration beyond the visible stain.
The exterior sequence
From the ground, the inspector checks fascia, gutter apron separation, drainage paths, and downspout discharge. On the roof, the sequence usually prioritizes pipe boots, vents, skylights, and other penetrations, then flashing, field shingles or tiles, and valleys. This order reduces the chance of replacing sound field material while overlooking a failed penetration or transition.
Each finding should be photographed and tied to a precise location. A slope-by-slope report should identify the affected plane, include close and wide views, record moisture evidence, and explain whether the recommended work is localized or part of a larger replacement scope. That record helps homeowners compare estimates and gives an adjuster clearer evidence when storm-related damage is under review.
For an active leak, stabilize the room before climbing onto the roof. Place buckets under drips, move furnishings, open attic vents or access panels when safe, and photograph the ceiling, attic path, and affected materials. The AMPM Restoration Services emergency guide can help organize those immediate steps while an inspection is arranged. A written roof inspection service should identify the source, affected materials, and recommended work sequence, rather than provide only a verbal guess.
What Residential Roof Repair Really Costs in 2026
Roof repair pricing makes more sense when homeowners separate a small failure from a roof section that has lost its ability to protect the building. A pipe boot, isolated flashing joint, or single damaged shingle belongs in a different decision category from rotten decking, a failed valley, or damage spread across several slopes.
The following ranges are planning bands, not quotes:
| Repair Tier | What It Covers | California Cost Range in 2026 |
|---|---|---|
| Small spot repair | Shingle swaps, flashing reseal, pipe boot replacement | Approximately $350 to $900 |
| Moderate repair | Partial decking replacement, valley rebuilds, localized structural correction | Approximately $1,200 to $3,500 |
| Large repair | Extensive decking, multiple slopes, or work approaching replacement scope | Approximately $4,000 to $8,000 or more |
Material changes the labor and handling requirements. Composition shingles are generally simpler to replace in small areas than tile, standing seam metal, or torch-down roofing. Tile can require careful removal and matching, while low-slope systems demand attention to seams and drainage. California requirements can also affect the scope, particularly where cool-roof provisions, wildfire-zone requirements, or structural repairs apply.
A national cost average can also hide the severity of the current market. A major Verisk roofing report found that average U.S. residential roof repair costs reached $4,699 in 2025, 25% higher than the prior four-year average. Average replacement costs reached $17,631, up 33% over the same baseline. In 2024, roof repair and replacement cost value totaled nearly $31 billion, up nearly 30% since 2022, and roof-related line items represented more than a quarter of residential claim value.
Those figures explain why repair-versus-replace conversations have become more difficult. Even when claim volume falls, each loss can carry greater severity. Bay Area labor availability, access, material matching, code compliance, and insurance documentation can all move a project outside a simple patch budget.
Budgeting insight: The cheapest immediate repair isn't always the lowest-cost roof decision if the same slope keeps failing.
Homeowners reviewing an estimate should compare the described damage, materials, quantities, exclusions, permit assumptions, and warranty terms. This guide to verifying a roof repair quote can help organize that comparison before work begins.
When to DIY and When to Call a Licensed Roofer
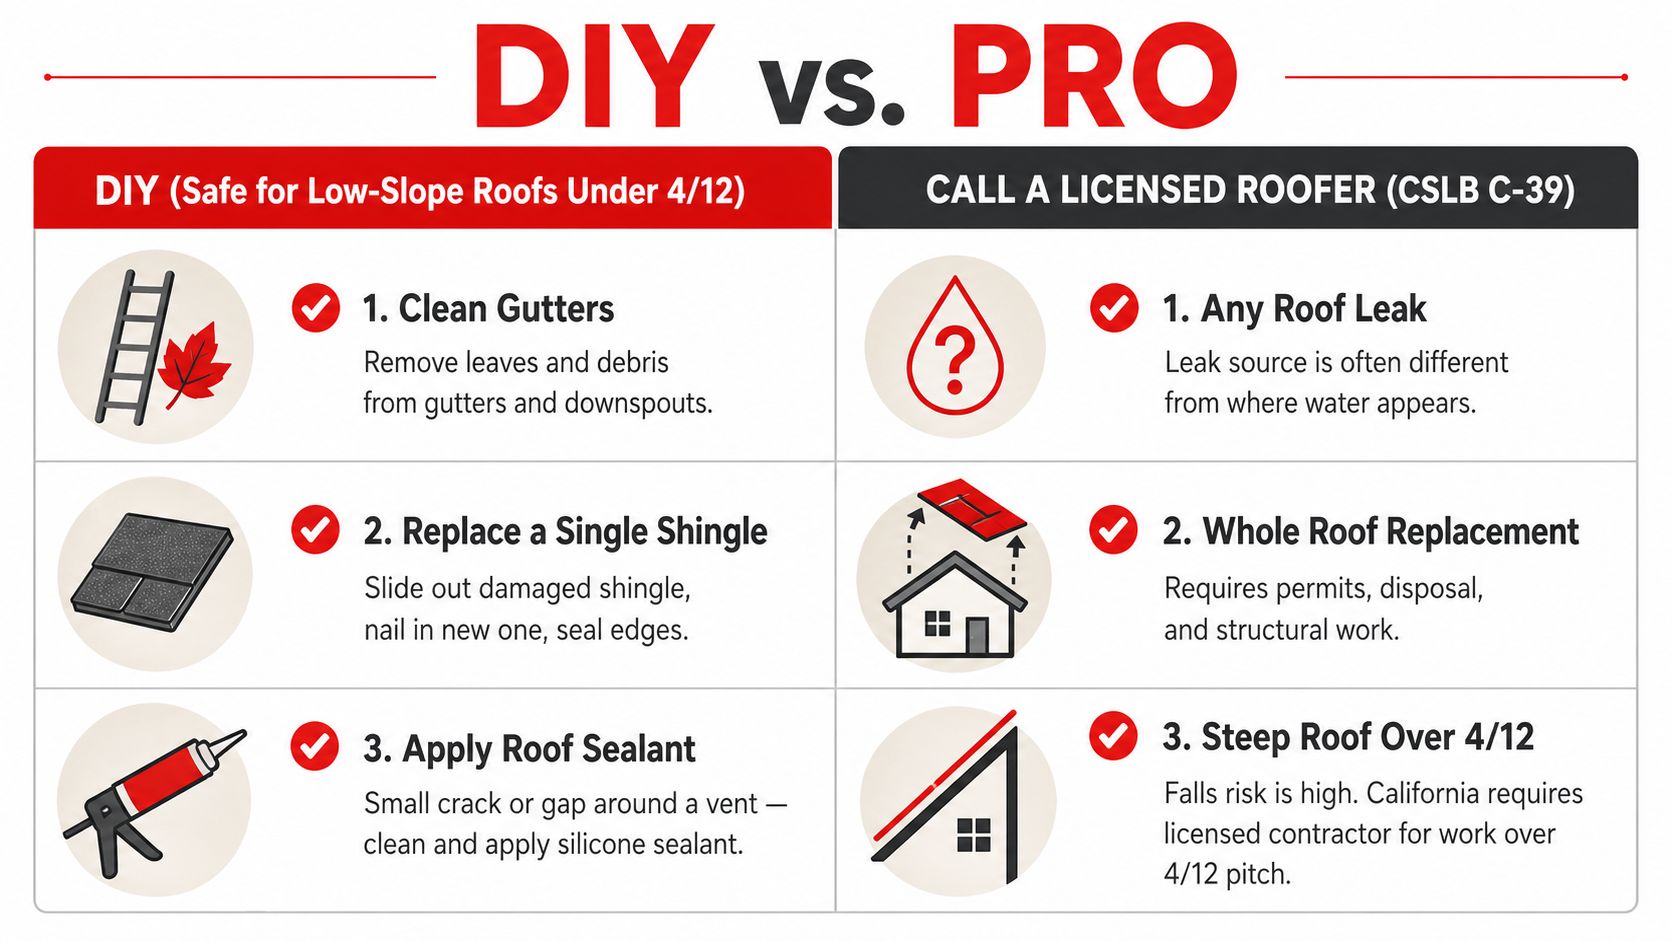
A homeowner can handle limited ground-level maintenance, but roof access changes the risk calculation quickly. In California, a contractor performing roofing work should hold the appropriate CSLB C-39 roofing classification, and the practical question isn't only whether someone can complete a task. It's whether the work will preserve the roof assembly, manufacturer requirements, insurance documentation, and personal safety.
DIY may be reasonable for a low-slope, single-story roof when the homeowner has proper fall protection and is dealing with a narrow, non-structural task. Examples include cleaning gutters, resealing a small gutter joint, applying compatible sealant to a minor flashing gap, or replacing a single shingle when the surrounding materials are sound.
The boundary becomes firm when the repair affects the roof's hidden layers or requires difficult access:
- Structural decking: Rotten or soft sheathing needs evaluation before removal and replacement.
- Underlayment: A visible surface patch won't correct concealed underlayment failure.
- Valleys and multiple planes: Water concentration and transitions make these poor DIY targets.
- Tile or slate: Walking and handling can damage adjacent pieces, even when the original break looks isolated.
- Warranty-bearing systems: Unapproved work can interfere with manufacturer or installer coverage.
- Insurance claims: An undocumented repair can make the original cause and extent harder to establish.
A steep roof, active leak, sagging area, or repair near electrical equipment also calls for a professional inspection. The infographic's DIY guidance is limited to low-slope conditions, and any homeowner uncertain about pitch, access, or material compatibility should stay off the roof.
Unlicensed work can expose the property owner to a CSLB complaint, personal liability if a worker is injured, warranty disputes, and insurance complications. California code requirements also vary by jurisdiction, so a task that appears small may become regulated once it includes structural members or a substantial roof area.
The decision can be reduced to five questions:
- Is the roof low and safely accessible?
- Is the slope gentle rather than steep?
- Is the material a simple, compatible shingle?
- Is the roof outside all warranty obligations?
- Is there no active or potential insurance claim?
If any answer is unfavorable, hiring a licensed roofer is the more defensible choice.
Permits, Warranties, and Insurance in California
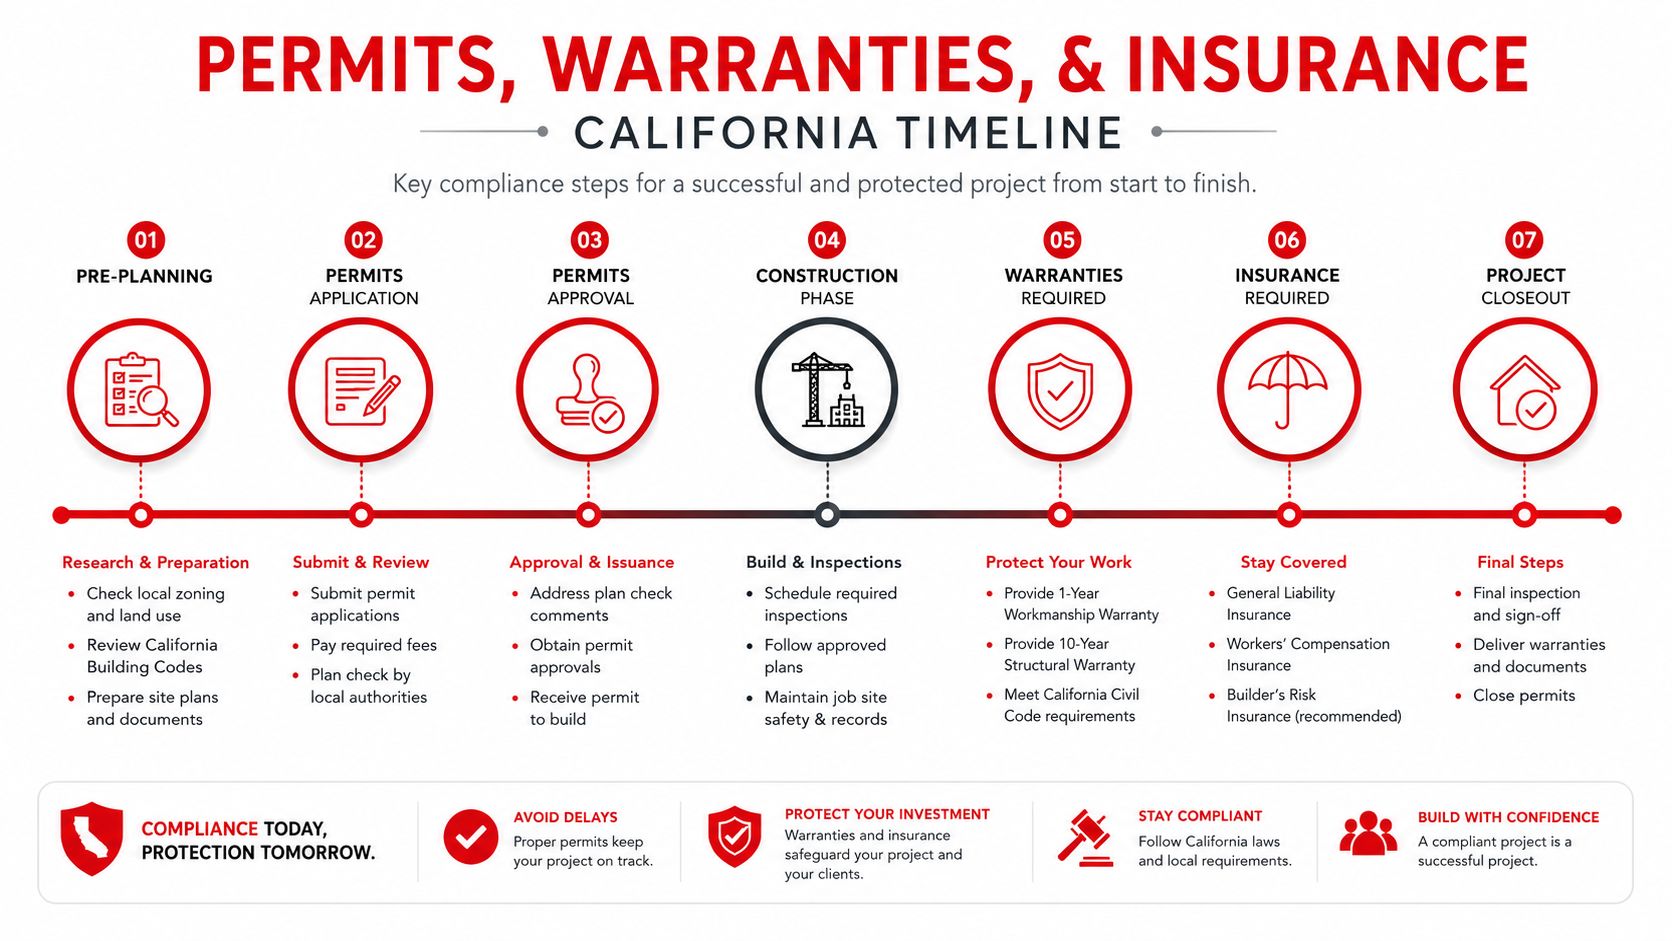
California homeowners usually have three separate documentation questions, and confusing them creates avoidable problems. A permit concerns building-code approval. A warranty concerns material or workmanship obligations. Insurance concerns whether a covered event caused the damage and whether the claim is supported.
Permit decisions
Residential roof-replacement work falls under the California Residential Code, which is Part 2.5 of Title 24 of the California Code of Regulations, as shown in the California Building Standards Commission code listings. Local rules still control the permit process. Some California permit guidance states that roof repairs under 10% of the roof area or 100 square feet, whichever is less, may not require a permit. The same guidance says dry-rot repairs involving 32 square feet or more of replaced decking, or alterations to rafters and other structural members, trigger permitting requirements, as described in this local reroofing handout%20ASPHALT%20SHINGLE%20RE-ROOF%20INFORMATION.pdf).
That threshold isn't universal. The city or county should confirm whether the proposed work requires a permit before demolition begins.
Warranty and claim records
Material warranties cover the roofing product under specified conditions. Workmanship warranties come from the installer and depend on proper installation, maintenance, and documented exclusions. Unapproved repairs can create disputes over both categories, so homeowners should keep the original contract, product information, inspection report, invoices, permit records, and completion photographs.
Insurance generally covers roof leaks caused by a sudden covered peril such as wind, hail, or a fallen tree. It generally excludes leaks caused by age, wear, or neglected maintenance, according to this homeowners insurance roof-leak explanation. A general insurance overview, such as this Victorville home insurance buyer's guide, can help homeowners understand policy terminology, but the policy itself controls the claim.
The documentation timeline should be simple:
- At discovery: Photograph the stain, affected room, and visible exterior conditions.
- During inspection: Obtain a written diagnosis with photos and a repair-versus-replace explanation.
- Before work: Confirm permit requirements, contractor licensing, insurance, and warranty terms.
- During construction: Keep material receipts, progress photos, and change orders.
- At completion: Save the final invoice, permit closure, completion photos, and warranty paperwork.
A separate roof home warranty resource can help homeowners distinguish warranty coverage from insurance coverage before signing a repair agreement.
Your Next Steps After Reading This Guide
A Concord or East Bay homeowner can make the next week productive without climbing onto an unsafe roof. The first goal is evidence, not a rushed patch.
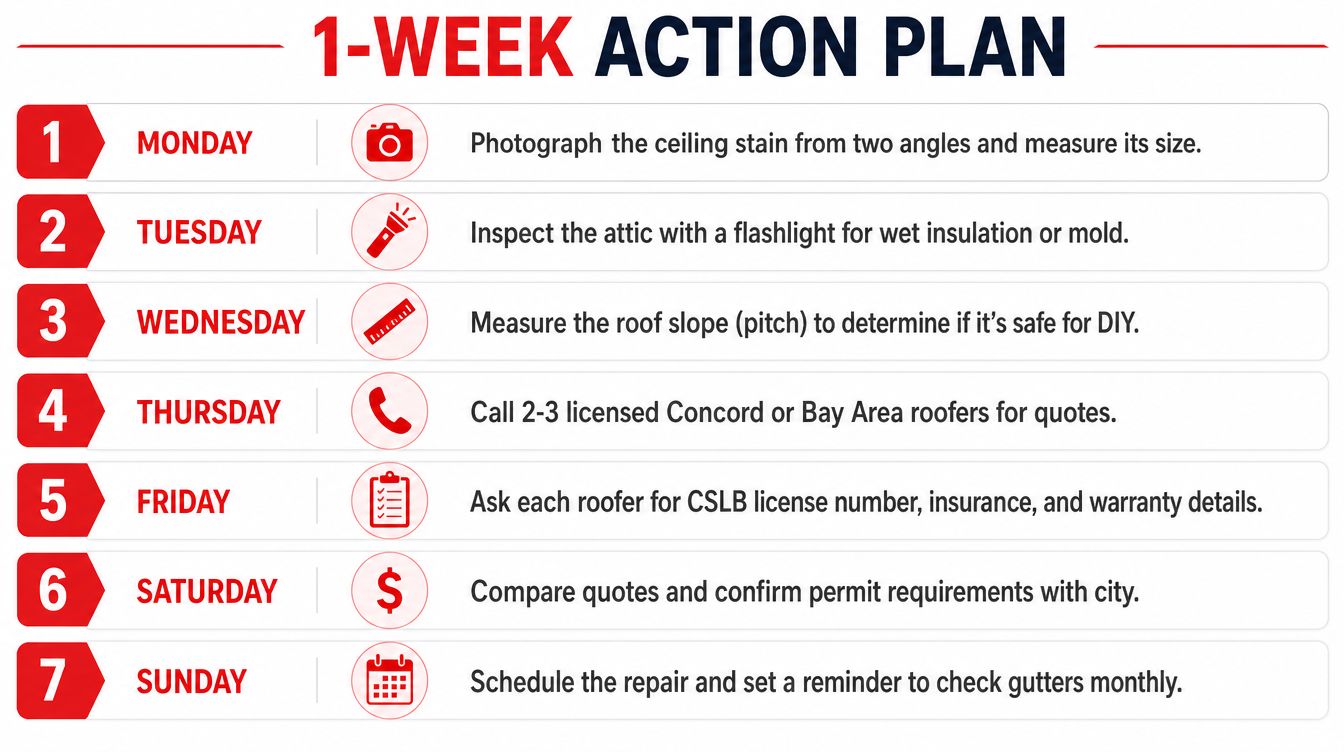
A practical seven-day response
Monday: Photograph the ceiling stain from two angles and measure its size. Note the room, nearby fixtures, and distance from the closest exterior wall.
Tuesday: After rain, inspect the attic from a safe position with a flashlight. Look for active drips, wet insulation, stained sheathing, or rusted nail tips. Don't disturb insulation or walk on ceiling drywall.
Wednesday: Record the roof age, material, repair history, and available warranty paperwork. A contractor needs those details to judge whether matching material and localized repair are realistic.
Thursday: Call licensed California roofing contractors for documented inspections. Request written findings, photographs, the suspected entry point, recommended repairs, and any suggested replacement scope.
Friday: Ask for the CSLB license number, insurance information, workmanship warranty, material details, and permit assumptions.
Saturday: Compare the diagnosis, not only the total price. A low bid that omits damaged decking, flashing replacement, disposal, or permit work isn't a comparable proposal.
Sunday: Choose the repair path, schedule the work, and retain every document. Early records are easier to produce than evidence reconstructed after interior damage spreads.
Replacement deserves serious consideration when repairs during the last five years exceed roughly 30% of replacement cost, or when more than 25% of the slope is compromised. Those decision thresholds come from established repair-versus-replace guidance, but the final recommendation still depends on roof age, material, code requirements, structural condition, and documented findings.

A professional inspection before contacting the insurance carrier gives the homeowner a clearer record of what happened and what the roof needs. Early documentation consistently puts the property owner in a stronger position than post-damage scrambling.
California Roof Pros provides licensed residential roof inspections, leak detection, repairs, replacements, and insurance-claim assistance for homeowners in Concord, the East Bay, and communities across California. Visit California Roof Pros to request a documented inspection and discuss the right repair or replacement path for the property.

The CA Roof Pros Editorial Team brings together roofing professionals and experienced content specialists dedicated to providing accurate, practical information about roofing, repairs, maintenance, and replacement. Every article is researched and reviewed to help California homeowners make informed decisions about their roofing needs.